AWS Instance Scheduler is a service used as a means to reduce the cost of services on AWS by ensuring that services are started up when in use and stopped when not in use. In my case, I needed to reduce of running our UAT and Demo EC2 instances at work. There are about 10 of those running round the clock and I reckon that if I was able to ensure that these instances are only running during work hours we could be saving about 60% costs on AWS.
It should be noted that there will be some negligible costs involved in setting AWS Instance scheduler. This is because other services will need to be created and run to set up the stack required for this purpose. The main work-horse is AWS Lambda which lets us run code without needing to provision a server. This code is what is executed to start/stop the required services. Lamda however cannot run itself, it needs to be triggered.
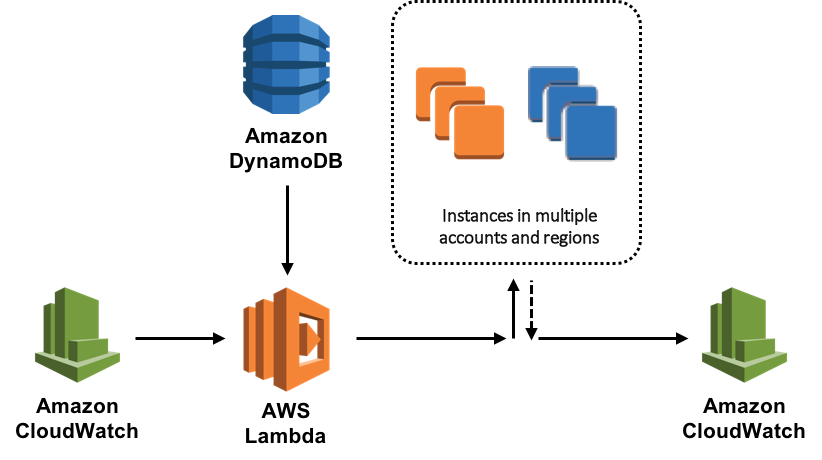
This is where CloudWatch comes in. CloudWatch triggers AWS Lamda which reads the CloudFormation state from DynamoDB and executes the required function on the instances and then updates CloudWatch so that the state can be read the next time the Lamda function runs. All this is deployed using what is called a CloudFormation stack. CloudFormation is an infrastructure as code provisioning tool which provides a common language to enable us model and provision AWS resources in our cloud environment.
To set up AWS instance scheduler, we follow the steps below;
- Login to your AWS console and search for CloudFormation
- Click on Create Stack. In Step 1, we either have a template ready, use a sample template or create a new template using the Designer. For the purpose of this exercise, we'll select 'Template is ready' and select 'Amazon S3 URL. In the Amazon S3 field we paste this link; https://s3.amazonaws.com/solutions-reference/aws-instance-scheduler/latest/instance-scheduler.template
-
Click Next to the 'Specify Details' page. Enter a name in the 'Stack name' field.
- Add a tag for the Instance Scheduler tag. In my case, I used 'Schedule'
- Services to schedule (This can be EC2, RDS or both')
- Scheduling enabled: Yes
- Regions: If you don't specify a region, it will take the region within which the stack is being created.
- Default time zone: Select your time zone.
- This account: You can schedule instances either in the account you created the CloudFormation stack in or in another account that you own.
- Frequency: The frequency of running the Schedular - It is recommended to select as much time as possible if the number of instances is large to avoid conflicts. In my case, I selected 60.
- Memory size: defaulted to 128MB.
All the other fields are optional however Started tags and Stopped tags are good for identifying started and stopped instances. I used the following values;
Started tags: SchedStart="Scheduler started"
Stopped tags: SchedStop="Scheduler stopped"
- Configure stack options - These are optional configuration details you may require like adding tags you want to add to the resources in your stack. It is also recommended to create an IAM role that has permission to create, modify or delete resources in the stack. If a role is not chosen, then CloudFormation uses the permissions of the user creating the stack. 'Advanced options' are additional options like notifications, stack policy which can be applied in cases where you want to add some level of protection to the stack.
- Review - The last page shows a review of the CloudFormation stack to be created. One you are happy, check the box "I acknowledge that AWS CloudFormation might create IAM resources." and click 'Create stack"
At this point, the stack goes through the process of being created. Once this process is completed, it will have deployed Amazon CloudWatch, AWS Lamda and Amazon DynamoDB. We have a couple of configurations to set before our job is done.
From the AWS Dashboard, search for and select DynamoDB. We need to set our InstanceSchedule Config table. When you click on Tables, you will see two tables. The one we need is the ConfigTable. It is named in the format
For the sake of this exercise, select any of the periods ('office-hours') Click on 'Actions' at the top of the table and click on 'Duplicate'. A pop-up will show up allowing you to make changes as required. Most importantly, you will need to change begintime, description and endtime. Click 'save'.
Pick one of the schedules and duplicate that as well. Change the values as required but most importantly, ensure that the name must be unique. This is because it will be used to tag the resource that we want to schedule. Also important is the timezone. I made a mistake here by picking the wrong timezone which meant that my instances did not start and stop when I needed them to until I corrected this.
Finally, you will need to tag the instances (EC2 or RDS) which you want to schedule. Go to the AWS Dashboard and search for EC2. If the instances you want to schedule are already running, then right click on the instance and select 'Instance Setting' then 'Add/Edit' tags.
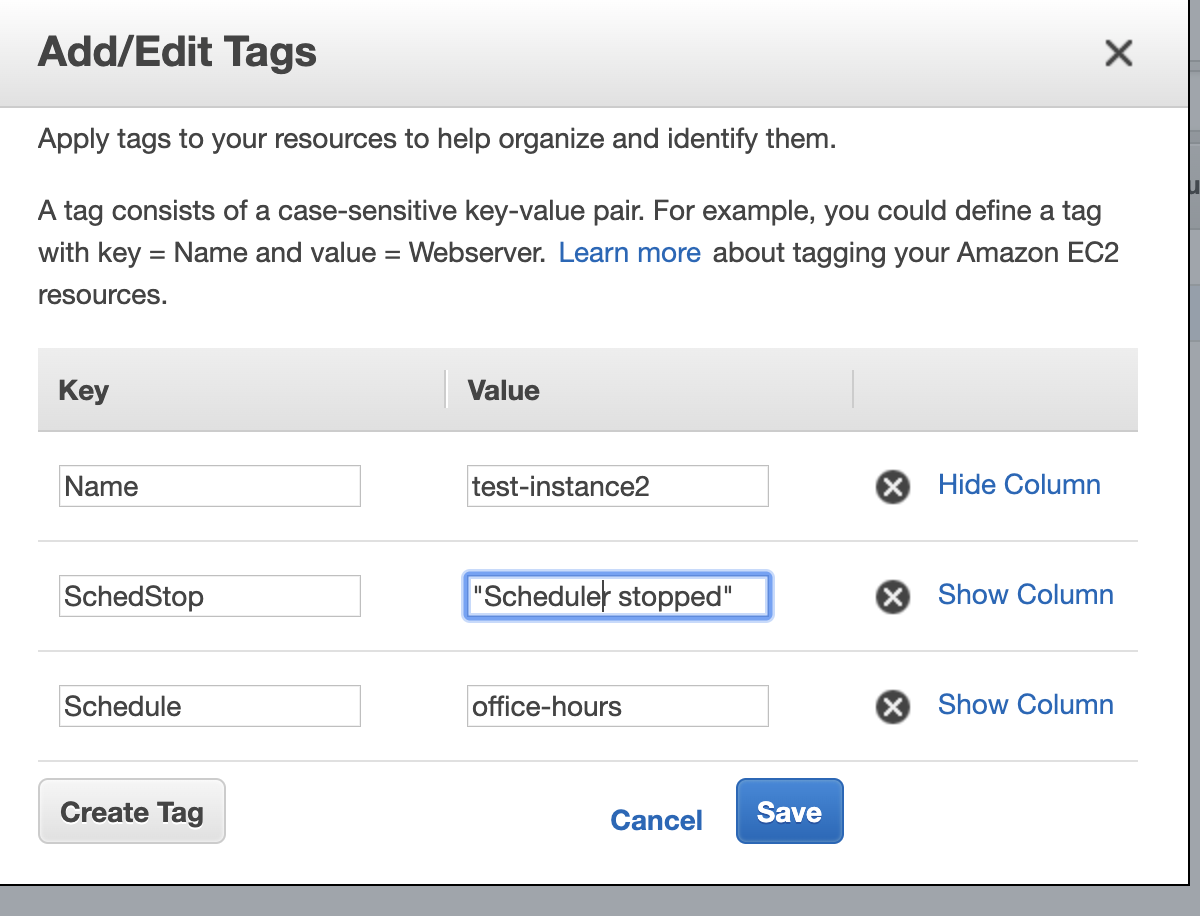
Add the tag 'Schedule' which must be the same as the config that we set in DynamoDB. Optionally, you can add tags for the start and stopped state of the instances. Once the Lamda function executes, it will check DynamoDB for our Schedules and will use the tags to determine which instance should be started or stopped.
 Once this is done, sit back and see your stack work for you.