
In the Part 1 of this series, we went through provisioning an EC2 instance with Terraform. In this second part, we will be taking a step further by provisioning a load balancer serving requests for two EC2 instances.
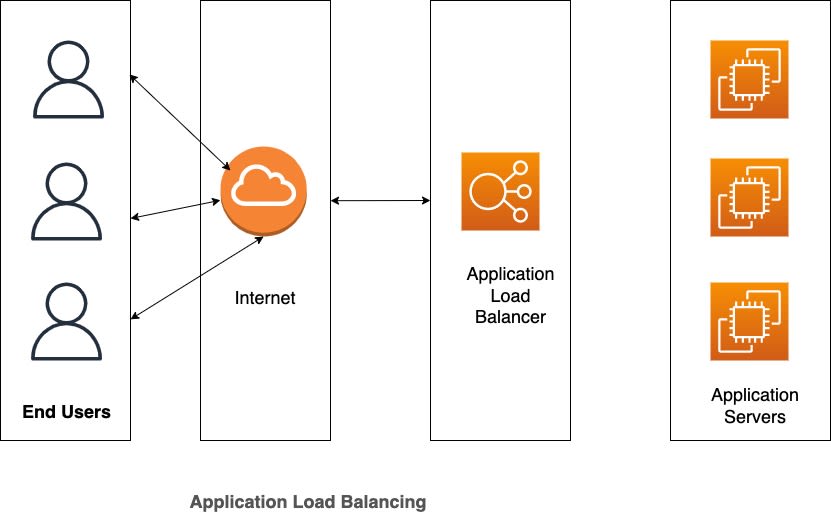
First let’s answer the question, What is a Load Balancer and why would you need to provision one? You can imagine a load balancer as a Traffic Marshall, directing requests to and from your web servers. The application servers share a private network with the load balancer which is exposed to the internet, allowing the load balancer receive requests from clients (end users) and route the request to any of the application servers. The load balancer then receives the response from the servers and returns it to the client(s).
One advantage of load balancers is that when one of the servers go down for any reason, the application does not go down as in the case where you only have one server running the application. The load balancer routes the request to the other servers available giving the administrator the opportunity to repair or replace the faulty server.
Now that we know what a load balancer is and what it does, let’s now look the requirements needed to create a load balanced infrastructure on AWS.
In the context of AWS, the standard practice is to create the application servers in different available zones. This is to ensure that even if anything happens to one availability zone, the load balancer can still serve requests to servers in other availability zones. To create a load balancer in AWS, we will need to create the following;
A Listener - A listener checks for connection requests from client. Rules are set to determine what should happen when certain conditions are met in the request.
Target Groups - A target group consists of one or more registered targets, for example, EC2 instances. A health check is configured on each target group which enables the load balancer determine whether the target is healthy or not. If a target is healthy, then requests be be routed to that target otherwise, requests are routed to other targets.
Based on what we have now learnt. Let’s start making changes to the code we wrote in Part 1.
First, let’s define a couple of variables. We will create these variables in a file called, variables.tf.
I have added a few comments to describe what each variables stands for.
variable “server_port” {
  description = “The port the server will use for HTTP requests”
  type        = number
  default     = 80
}

variable "alb_name" {
  description = "The name of the Load Balancer"
  type        = string
  default     = "example-alb"
}

variable "instance_security_group_name" {
  description = "The name of the security group for the EC2 Instances"
  type        = string
  default     = "example-instance-sg"
}

variable "alb_security_group_name" {
  description = "The name of the security group for the ALB"
  type        = string
  default     = "example-alb-sg"
}
Next, we will update our `main.tf` file. I will highlight some of the changes and try to explain what the change is about.
Ideally, we could have created a load balancer and a bunch of EC2 instances, then associate each EC2 instance to the load balancer. That would work but it is not very flexible. Instead, what we would do is leverage one of the features of AWS known as Auto scaling. What this does is to monitors your application and adjusts resources in line with demand.
The first thing we are going to do therefore is create a launch configuration resource. Launch configuration is simply a template that an auto scaling group uses to launch EC2 instances.
# Create launch configuration for ASG
resource "aws_launch_configuration" "examplelc" {
  name_prefix          = "examplelc_config-"
  image_id             = "ami-04842bc62789b682e"
  instance_type        = "t2.micro"
  security_groups      = [aws_security_group.instance.id]
  user_data            = file("userdata.tpl")
  lifecycle {
    create_before_destroy = true
  }
Most of configuration is self explanatory bit I will highlight two of the items. user_data and lifecycle EC2 grant us the ability to define user data which is a set of instructions on what should happen when the each EC2 instance in the Auto scaling group is created. We have created a file called user-data.tpl which contains the following;
#!/bin/bash
sudo apt update -y &&
sudo apt install -y nginx

AWS_INSTANCE_ID=`curl -s http://169.254.169.254/latest/meta-data/instance-id`
HOSTNAME=`curl -s http://169.254.169.254/latest/meta-data/hostname`

cat > index.html << EOF
    <html>
        <head>
            <title>Terraform In Action</title>
            <script src="https://cdn.tailwindcss.com"></script>
        </head>
        <body>
            <div class="bg-gray-50 p-6">
                    <div class="mb-6 text-3xl flex justify-center overflow-hidden">

                        <h1>Terraform In Action</h1>
                    </div>

                    <div class="flex">
                        <div class="w-1/3">Instance ID:</div>
                        <div>${AWS_INSTANCE_ID}</div>
                    </div>
                        <div class="flex">
                        <div class="w-1/3">Host:</div>
                        <div>${HOSTNAME}</div>
                    </div>
                        <div class="flex">
                        <div class="w-1/3">Availability Zone:</div>
                        <div>${AZ}</div>
                    </div>
                </div>
        </body>
    </html>
EOF

sudo cp index.html /var/www/html/index.html
The template is a shell script executed once the instance is created and running. It installs nginx, created an html file and copies the file to the document root so that it can be accessed once load balancer starts serving requests.
The lifecycle configuration ensures that before an existing instance is destroyed, it would first provision a new instance that would replace it.
Now that we have our launch configuration in place, we can now create the autoscaling group.
resource "aws_autoscaling_group" "examplelc" {
  launch_configuration = aws_launch_configuration.examplelc.id
  availability_zones   = data.aws_availability_zones.all.names
  min_size = 2
  max_size = 4
  target_group_arns = [aws_lb_target_group.asg.arn]
  health_check_type = "ELB"

  tag {
    key                 = "Name"
    value               = "example-webserver"
    propagate_at_launch = true
  }
}
The autoscaling group examplelc above, will use the launch configuration we created previously. We have defined that it should create the instances in any of the availability zones in our region. The minimum number of instances that should be created is 2 while the maximum is 4. We define the health check configuration that the load balancer will use to verify that each instance is healthy so it can route requests accordingly.
Next we define the security groups both for the instances as well as the load balancer.
resource "aws_security_group" "instance" {
  name = var.instance_security_group_name

  ingress {
    from_port   = var.server_port
    to_port     = var.server_port
    protocol    = "tcp"
    cidr_blocks = ["0.0.0.0/0"]
  }

  ingress {
    from_port   = var.ssh_port
    to_port     = var.ssh_port
    protocol    = "tcp"
    cidr_blocks = ["0.0.0.0/0"]
  }

  egress {
    from_port   = 0
    to_port     = 0
    protocol    = "-1"
    cidr_blocks = ["0.0.0.0/0"]
  }
}

resource "aws_security_group" "alb" {
  name = var.alb_security_group_name

  # Allow inbound HTTP requests
  ingress {
    from_port   = 80
    to_port     = 80
    protocol    = "tcp"
    cidr_blocks = ["0.0.0.0/0"]
  }

  # Allow all outbound requests
  egress {
    from_port   = 0
    to_port     = 0
    protocol    = "-1"
    cidr_blocks = ["0.0.0.0/0"]
  }
}
Next, we define some data sources. These are information defined outside our configuration but required to provision our resources.
data "aws_vpc" "default" {
  default = true
}

data "aws_subnets" "default" {
    filter {
    name   = "vpc-id"
    values = [data.aws_vpc.default.id]
  }
}

data "aws_availability_zones" "all" {}
We are specifying to Terraform that the default vpc, subnets and all availability zones in our region should be used for the resources we are creating.
Let’s now create our load balancer.
resource "aws_lb" "myapp" {
  name               = var.alb_name
  load_balancer_type = "application"
  subnets            = data.aws_subnets.default.ids
  security_groups    = [aws_security_group.alb.id]
}

resource "aws_lb_target_group" "asg" {
  name     = var.alb_name
  port     = var.server_port
  protocol = "HTTP"
  vpc_id   = data.aws_vpc.default.id

  health_check {
    path     = "/"
    protocol = "HTTP"
    matcher  = "200"
    interval = 15
  }
}

resource "aws_lb_listener_rule" "asg" {
  listener_arn = aws_lb_listener.http.arn
  priority     = 100

  condition {
    path_pattern {
      values = ["*"]
    }
  }

  action {
    type             = "forward"
    target_group_arn = aws_lb_target_group.asg.arn
  }
}

resource "aws_lb_listener" "http" {
  load_balancer_arn = aws_lb.myapp.arn
  port              = 80
  protocol          = "HTTP"

  # By default, return a simple 404 page
  default_action {
    type = "fixed-response"

    fixed_response {
      content_type = "text/plain"
      message_body = "404: page not found"
      status_code  = 404
    }
  }
}
All the values starting with var. are defined in our variables.tf file. For instance, the name of our load balancer; var.alb_name is defined as example-alb
variable "alb_name" {
  description = "The name of the Load Balancer"
  type        = string
  default     = "example-alb"
}
To create our load balancer,
We defined the name, type, subnet and vpc group in the aws_lb resource
We create the target group, aws_lb_target_group which will contain references to all the instances that will be served by the load balancer as well as including the health check settings.
We create the listener rule, aws_lb_listener_rule which tells the load balancer to only allow requests meeting a particular pattern. In this case, we want the load balancer to handle requests matching anything.
Lastly we create the load balancer listener, aws_lb_listener where we configure the port and the kind of request to listen to, in this case, HTTP
Finally, a new file outputs.tf has been introduced. This file is what Terraform uses to output any information when it is in the process of provisioning our resources.
output "alb_dns_name" {
  value       = aws_lb.myapp.dns_name
  description = "The domain name of the load balancer"
}
We want Terraform to output the load balancer domain once it has been provisioned. This is useful so that we can simply just copy it and visit the page in our browser.
We have now taken a step further in our journey to setting up infrastructure on AWS using Terraform. In this second part, we created an autoscaling group containing a minimum of 2 and a maximum of 4 EC2 instances. We then created a load balancer listening on port 80 and configured it to serve requests to the EC2 instances.
You can find the source code in [here](https://github.com/stevepop/terraform-primer)